> ## Documentation Index
> Fetch the complete documentation index at: https://docs-staging.auth0-mintlify.app/llms.txt
> Use this file to discover all available pages before exploring further.
# サードパーティアプリケーション向け Enhanced Security への移行
> 強化されたセキュリティ制御が、既存および新規作成されたサードパーティアプリケーションにどのような影響を与えるかを確認できます。
export const AuthCodeGroup = ({children, dropdown}) => {
const [processedChildren, setProcessedChildren] = useState(children);
useEffect(() => {
let unsubscribe = null;
function init() {
unsubscribe = window.autorun(() => {
const processChildren = node => {
if (typeof node === "string") {
let processedNode = node;
for (const [key, value] of window.rootStore.variableStore.values.entries()) {
const escapedKey = key.replaceAll(/[.*+?^${}()|[\]\\]/g, (String.raw)`\$&`);
processedNode = processedNode.replaceAll(new RegExp(escapedKey, "g"), value);
}
return processedNode;
} else if (Array.isArray(node)) {
return node.map(processChildren);
} else if (node && node.props && node.props.children) {
return {
...node,
props: {
...node.props,
children: processChildren(node.props.children)
}
};
}
return node;
};
setProcessedChildren(processChildren(children));
});
}
if (window.rootStore) {
init();
} else {
window.addEventListener("adu:storeReady", init);
}
return () => {
window.removeEventListener("adu:storeReady", init);
unsubscribe?.();
};
}, [children]);
return {processedChildren};
};
export const AuthCodeBlock = ({filename, icon, language, highlight, children}) => {
const [displayText, setDisplayText] = useState(children);
const [copyText, setCopyText] = useState(children);
const wrapperRef = React.useRef(null);
useEffect(() => {
let unsubscribe = null;
function init() {
if (!window.autorun || !window.rootStore) {
return;
}
unsubscribe = window.autorun(() => {
let processedChildrenForDisplay = children;
let processedChildrenForCopy = children;
for (const [key, value] of window.rootStore.variableStore.values.entries()) {
const escapedKey = key.replaceAll(/[.*+?^${}()|[\]\\]/g, (String.raw)`\$&`);
let displayValue = value;
if (key === "{yourClientSecret}" && value !== "{yourClientSecret}") {
displayValue = value.substring(0, 3) + "*****MASKED*****";
}
processedChildrenForDisplay = processedChildrenForDisplay.replaceAll(new RegExp(escapedKey, "g"), displayValue);
processedChildrenForCopy = processedChildrenForCopy.replaceAll(new RegExp(escapedKey, "g"), value);
}
setDisplayText(processedChildrenForDisplay);
setCopyText(processedChildrenForCopy);
});
}
if (window.rootStore) {
init();
} else {
window.addEventListener("adu:storeReady", init);
}
return () => {
window.removeEventListener("adu:storeReady", init);
unsubscribe?.();
};
}, [children]);
useEffect(() => {
if (!wrapperRef.current) return;
const originalWriteText = navigator.clipboard.writeText.bind(navigator.clipboard);
let isOverriding = false;
const handleClick = e => {
const button = e.target.closest('[data-testid="copy-code-button"]');
if (!button || !wrapperRef.current.contains(button)) return;
isOverriding = true;
navigator.clipboard.writeText = text => {
if (isOverriding) {
isOverriding = false;
navigator.clipboard.writeText = originalWriteText;
return originalWriteText(copyText);
}
return originalWriteText(text);
};
setTimeout(() => {
if (isOverriding) {
isOverriding = false;
navigator.clipboard.writeText = originalWriteText;
}
}, 100);
};
const wrapper = wrapperRef.current;
wrapper.addEventListener('click', handleClick, true);
return () => {
wrapper.removeEventListener('click', handleClick, true);
if (navigator.clipboard.writeText !== originalWriteText) {
navigator.clipboard.writeText = originalWriteText;
}
};
}, [copyText]);
return
{displayText}
;
};
2026年10月23日より、Auth0はManagement API経由で新規作成されるサードパーティアプリケーションのデフォルトのセキュリティモードを変更します。今後、サードパーティアプリケーションでは、[OAuth 2.1のベストプラクティス](https://datatracker.ietf.org/doc/html/draft-ietf-oauth-v2-1)に沿った強化されたセキュリティ制御がデフォルトで適用されます。
この変更の対象となるのは、2026年4月23日より前からサードパーティアプリケーションを使用していたテナントのみで、影響を受けるのは新規作成されるアプリケーションに限られます。既存のサードパーティアプリケーションは、変更対応なしでこれまでどおり引き続き動作します。
Auth0は、すべての新規サードパーティアプリケーションで強化されたセキュリティ制御を採用することを強く推奨しています。強化された制御では、API認可の明示化、PKCEの必須化、OAuth 2.1とセキュリティのベストプラクティスに沿った厳選された機能セットが提供されます。さらに、強化された制御を備えたアプリケーションは、将来的にアプリケーション単位のレート制限や、より使いやすい管理ツールなどの機能も利用できるようになります。ただし、特定のユースケースで必要な場合は、既存の動作を維持することも可能です。
サードパーティアプリケーションの詳細については、[サードパーティアプリケーション](/docs/ja-jp/get-started/applications/third-party-applications)を参照してください。各モードで利用できる機能の詳細な比較については、[Feature comparison](#feature-comparison)を参照してください。特定の連携パターンに関するガイダンスについては、[Common scenarios](#common-scenarios)を参照してください。
どのような影響がありますか?
この移行による影響は、主に次の2点です。
1. Management API のデフォルト (非推奨化)
`POST /api/v2/clients` でサードパーティアプリケーションを作成する場合、`third_party_security_mode` のデフォルト値は、2026年10月23日より `permissive` (従来の動作) から `strict` (強化されたセキュリティ制御) に変更されます。
Auth0 Dashboard で作成されたすべてのサードパーティアプリケーションには、すでに強化されたセキュリティ制御が適用されています。これは Auth0 Dashboard からは設定できません。
2. Dynamic Client Registration (個別の設定)
[Dynamic Client Registration](/docs/ja-jp/get-started/applications/dynamic-client-registration) を使用している場合、DCR クライアントは別のテナント設定 `dynamic_client_registration_security_mode` によって制御されます。これはこの非推奨化とは別であり、個別に設定方針を決める必要があります。
移行作業
サードパーティアプリケーションを確認する
移行方法を選ぶ前に、サードパーティアプリケーションがどのように動作しているかを確認し、現在どのような要件があるのかを把握してください。確認するポイントは次のとおりです。
* 使用しているグラントタイプは何ですか? (authorization code、implicit、client credentials など)
* OIDC scopes (openid、profile、email) や IDトークンは必要ですか?
* Classic Login やレガシーエンドポイントを使用していますか?
* どのように作成されていますか? (Auth0 Dashboard/API から手動で、または DCR によって動的に)
サードパーティアプリケーションの数が少ない場合は、Auth0 Dashboard または Management API を使って個別に確認できます。各アプリケーションには、現在のセキュリティモード (`strict` または `permissive`) を示す `third_party_security_mode` プロパティがあります。
**既存の permissive アプリケーションのセキュリティを強化する**: API の [API access policies](/docs/ja-jp/get-started/apis/api-access-policies-for-applications) を見直し、必要に応じて **Require Client Grant** に設定することを検討してください。これにより、permissive のサードパーティアプリケーションは、それらの API にアクセスするために明示的なグラントが必要になります。なお、このポリシーはファーストパーティアプリケーションにも適用されるため、変更前に既存の連携を確認してください。
強化されたセキュリティ制御が連携にどのような影響を与えるかを理解するには、以下の [機能比較](#feature-comparison) を確認し、ご自身のケースが [一般的なシナリオ](#common-scenarios) のいずれかに当てはまるかを確認してください。[FAQ](#frequently-asked-questions) セクションでも、この移行に関するよくある質問を取り上げています。
ステップ 1: 新しいサードパーティアプリケーションの作成方法を選択する
Management API 経由で作成する新しいサードパーティアプリケーションに、強化されたセキュリティ制御を適用するか、既存の動作を維持するかを決定します。この選択は `POST /api/v2/clients` にのみ適用されます。Auth0 Dashboard で作成されたアプリケーションには、常に強化された制御が適用されます。
オプション A: 移行を完了する (推奨)
2026年10月23日までに移行を完了して、強化されたセキュリティ制御をデフォルトにしてください。この方法により、サードパーティアプリケーションを OAuth 2.1 のベストプラクティスに準拠させ、今後の機能に備えることができます。
1. 強化されたセキュリティ制御をテストする
互換性を検証するために、強化されたセキュリティ制御が適用されたテスト用のサードパーティアプリケーションを作成します。
Auth0 CLI を使用していますか?まだの場合は、このコマンドを実行する前に [CLI セッションをセットアップして認証してください](/docs/ja-jp/deploy-monitor/auth0-cli)。
```bash Auth0 CLI theme={null}
auth0 api post "clients" \
--data '{
"name": "Test Third-Party App",
"is_first_party": false,
"third_party_security_mode": "strict",
"app_type": "regular_web",
"callbacks": ["https://partner.example.com/callback"],
"grant_types": ["authorization_code", "refresh_token"]
}'
```
```bash cURL theme={null}
curl --request POST \
--url 'https://{yourDomain}/api/v2/clients' \
--header 'Authorization: Bearer {YOUR_MANAGEMENT_API_TOKEN}' \
--header 'Content-Type: application/json' \
--data '{
"name": "Test Third-Party App",
"is_first_party": false,
"third_party_security_mode": "strict",
"app_type": "regular_web",
"callbacks": ["https://partner.example.com/callback"],
"grant_types": ["authorization_code", "refresh_token"]
}'
```
レスポンスには、`tpc_` プレフィックスが付いた `client_id` と `third_party_security_mode: "strict"` が含まれます。
2. デフォルト権限を設定する
強化されたセキュリティ制御が適用されたサードパーティアプリケーションがAPIにアクセスするには、明示的なクライアントグラントが必要です。デフォルト権限では、すべてのサードパーティアプリケーションが自動的にアクセスできるAPIとスコープの基本セットを定義します。これは、アプリケーションごとに個別に権限を設定できない、動的に作成されるクライアントでは特に重要です。
また、個々のアプリケーション (`client_id` ごと) に対して固有の権限を定義し、デフォルトより広い、または狭いアクセスを付与することもできます。両方が設定されている場合は、アプリケーションごとの権限がデフォルト権限より優先されます。
1. **Applications > APIs** に移動します。
2. サードパーティアプリケーションにアクセスを許可するAPIを選択します。
3. **Settings** タブで、**Default Permissions for Third Party Apps** までスクロールします。
4. User Access と/または Client Access で **Authorized** を選択します。
5. 付与するスコープを選択します。
6. **Save** をクリックします。
```bash Auth0 CLI theme={null}
auth0 api post "client-grants" \
--data '{
"default_for": "third_party_clients",
"audience": "https://api.example.com",
"scope": ["read:items", "write:items"],
"subject_type": "user"
}'
```
```bash cURL theme={null}
curl --request POST \
--url 'https://{yourDomain}/api/v2/client-grants' \
--header 'Authorization: Bearer {YOUR_MANAGEMENT_API_TOKEN}' \
--header 'Content-Type: application/json' \
--data '{
"default_for": "third_party_clients",
"audience": "https://api.example.com",
"scope": ["read:items", "write:items"],
"subject_type": "user"
}'
```
サードパーティアプリケーション向けのデフォルト権限は、ユーザーアクセス (`subject_type: "user"`) 用とマシン間アクセス (`subject_type: "client"`) 用にそれぞれ別々に設定できます。
詳しくは、[サードパーティアプリケーションのデフォルト権限](/docs/ja-jp/get-started/applications/application-access-to-apis-client-grants#default-permissions-for-third-party-applications)を参照してください。
3. 互換性を検証する
強化されたセキュリティ制御を有効にした状態で、サードパーティアプリケーションを作成するワークフローをテストします。次の点を確認してください。
* アプリケーションで `authorization_code`、`refresh_token`、`client_credentials` のグラントタイプを使用できること
* 認可フローに PKCE が実装されていること
* OIDCスコープが不要であること
* Classic Login またはレガシーエンドポイントが不要であること
* テナントに、サードパーティのログインフローで実行が必要なアクティブな [ルール](/docs/ja-jp/customize/rules) がないこと。厳格なサードパーティアプリケーションではルールはサポートされておらず、エラーになります。ルールを使用している場合は、[Actions への移行](/docs/ja-jp/customize/actions/migrate/migrate-from-rules-to-actions)を検討するか、permissive mode を使用してください。
互換性の問題が見つかった場合は、[Troubleshoot サードパーティアプリケーション](/docs/ja-jp/get-started/applications/third-party-applications/troubleshooting) を参照してください。
4. 移行を完了する
互換性を確認したら、**Create Permissive Third-Party Clients by Default** トグルをオフにして移行を完了します。
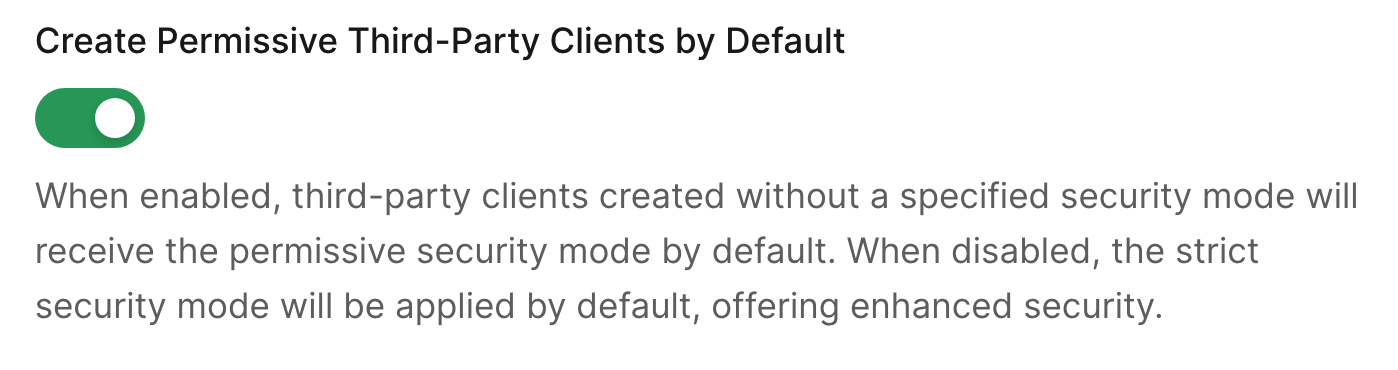 Auth0 Dashboard で次の操作を行います。
1. **Settings > Advanced** に移動します。
2. **Migrations** セクションまでスクロールします。
3. **Create Permissive Third-Party Clients by Default** をオフにします。
4. **Save** を選択します。
移行の完了後、`POST /api/v2/clients` でサードパーティアプリケーションを作成する際は、次のいずれかを行えます。
* `third_party_security_mode` パラメーターを省略する (拡張コントロールがデフォルトで適用されます) 、または
* `third_party_security_mode: "strict"` を明示的に設定する
**2026年10月23日以降**: 対象となるすべてのテナントで、**Create Permissive Third-Party Clients by Default** トグルは自動的にオフになります。既存の動作でアプリケーションを作成するには、`/api/v2/clients` エンドポイントへの `POST` リクエストで `third_party_security_mode: "permissive"` を明示的に指定する必要があります。
Auth0 Dashboard で次の操作を行います。
1. **Settings > Advanced** に移動します。
2. **Migrations** セクションまでスクロールします。
3. **Create Permissive Third-Party Clients by Default** をオフにします。
4. **Save** を選択します。
移行の完了後、`POST /api/v2/clients` でサードパーティアプリケーションを作成する際は、次のいずれかを行えます。
* `third_party_security_mode` パラメーターを省略する (拡張コントロールがデフォルトで適用されます) 、または
* `third_party_security_mode: "strict"` を明示的に設定する
**2026年10月23日以降**: 対象となるすべてのテナントで、**Create Permissive Third-Party Clients by Default** トグルは自動的にオフになります。既存の動作でアプリケーションを作成するには、`/api/v2/clients` エンドポイントへの `POST` リクエストで `third_party_security_mode: "permissive"` を明示的に指定する必要があります。
オプション B: 既存の動作をデフォルトとして維持する
既存の動作をデフォルトとしてサードパーティアプリケーションを引き続き作成する必要がある場合は、強化されたセキュリティ制御を導入する準備が整うまで、**Create Permissive Third-Party Clients by Default** トグルを有効のままにしておくことができます。
このオプションを選ぶと現在のワークフローは維持されますが、強化された制御によるセキュリティ上のメリットは得られません。Auth0 では、すべての新しいサードパーティアプリケーションに対して強化されたセキュリティ制御を導入することを強く推奨しています。
期限前
**Create Permissive Third-Party Clients by Default** トグルは有効のままです (トグル自体の操作は不要です) 。ただし、期限後はセキュリティモードを明示的に指定する必要があるため、それに対応できるようワークフローを準備しておく必要があります。
アプリケーションの作成コードを更新し、`third_party_security_mode: "permissive"` を明示的に渡すようにしてください。
```bash Auth0 CLI theme={null}
auth0 api post "clients" \
--data '{
"name": "Partner Integration",
"is_first_party": false,
"third_party_security_mode": "permissive",
"app_type": "regular_web",
"callbacks": ["https://partner.example.com/callback"]
}'
```
```bash cURL theme={null}
curl --request POST \
--url 'https://{yourDomain}/api/v2/clients' \
--header 'Authorization: Bearer {YOUR_MANAGEMENT_API_TOKEN}' \
--header 'Content-Type: application/json' \
--data '{
"name": "Partner Integration",
"is_first_party": false,
"third_party_security_mode": "permissive",
"app_type": "regular_web",
"callbacks": ["https://partner.example.com/callback"]
}'
```
期限前にこの方法をテストし、ワークフローでこの明示的なパラメーターを正しく処理できることを確認してください。
期限後
2026年10月23日をもって、**既定で permissive のサードパーティクライアントを作成**トグルは自動的にオフになります。既存の動作でアプリケーションを引き続き作成するには、すべての `POST /api/v2/clients` リクエストで `third_party_security_mode: "permissive"` を明示的に設定する必要があります。
`third_party_security_mode` パラメーターを省略すると、強化されたセキュリティ制御が既定で適用されます。
ステップ 2: Dynamic Client Registration の扱いを選択する
[Dynamic Client Registration](/docs/ja-jp/get-started/applications/dynamic-client-registration) を使用している場合は、DCR クライアントのセキュリティモードを別途設定してください。これは [Management API のデフォルト変更](/docs/ja-jp/troubleshoot/product-lifecycle/deprecations-and-migrations/migrate-to-enhanced-security-third-party-applications#1-management-api-default-the-deprecation) とは独立しているため、いつでも設定できます。
DCR で強化されたセキュリティ制御を有効にする前に、サードパーティアプリケーション向けの [デフォルトのAPI権限](/docs/ja-jp/get-started/applications/application-access-to-apis-client-grants#default-permissions-for-third-party-applications) を設定していることを確認してください。デフォルト権限が設定されていないと、DCR クライアントはどの API にもアクセスできません。
現在の DCR の動作を確認する
現在の DCR セキュリティモード設定を確認します。
1. **Settings > Advanced** に移動します。**Dynamic Client Registration (DCR) Security Mode** で、現在の値を確認します。
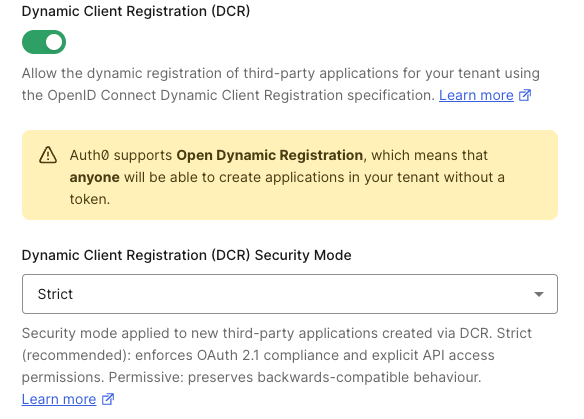 `/api/v2/tenants/settings` エンドポイントに `GET` リクエストを送信して、テナント設定を取得します。
```bash Auth0 CLI theme={null}
auth0 api get "tenants/settings"
```
```bash cURL theme={null}
curl --request GET \
--url 'https://{yourDomain}/api/v2/tenants/settings' \
--header 'Authorization: Bearer {YOUR_MANAGEMENT_API_TOKEN}'
```
レスポンス内の `dynamic_client_registration_security_mode` プロパティを確認してください。存在しない場合、DCR クライアントは現在、既存の動作をデフォルトで使用しています。
動的に登録されたクライアントに適用するセキュリティモードを選択します。
**オプション A: DCR クライアントに強化されたセキュリティ制御を適用する** (推奨)
DCR で strict モードを有効にする前に、サードパーティアプリケーション向けの[デフォルト権限](/docs/ja-jp/get-started/applications/application-access-to-apis-client-grants#default-permissions-for-third-party-applications)を設定してください。デフォルト権限が設定されていない場合、DCR クライアントはいずれの API にもアクセスできません。
`dynamic_client_registration_security_mode` を `strict` に設定します。
```bash Auth0 CLI theme={null}
auth0 api patch "tenants/settings" \
--data '{
"dynamic_client_registration_security_mode": "strict"
}'
```
```bash cURL theme={null}
curl --request PATCH \
--url 'https://{yourDomain}/api/v2/tenants/settings' \
--header 'Authorization: Bearer {YOUR_MANAGEMENT_API_TOKEN}' \
--header 'Content-Type: application/json' \
--data '{
"dynamic_client_registration_security_mode": "strict"
}'
```
**オプション B: DCR クライアントの既存の動作を維持する**
`dynamic_client_registration_security_mode` を `permissive` のままにするか、`permissive` に設定します。
```bash Auth0 CLI theme={null}
auth0 api patch "tenants/settings" \
--data '{
"dynamic_client_registration_security_mode": "permissive"
}'
```
```bash cURL theme={null}
curl --request PATCH \
--url 'https://{yourDomain}/api/v2/tenants/settings' \
--header 'Authorization: Bearer {YOUR_MANAGEMENT_API_TOKEN}' \
--header 'Content-Type: application/json' \
--data '{
"dynamic_client_registration_security_mode": "permissive"
}'
```
詳しくは、[Dynamic Client Registration](/docs/ja-jp/get-started/applications/dynamic-client-registration)を参照してください。
`/api/v2/tenants/settings` エンドポイントに `GET` リクエストを送信して、テナント設定を取得します。
```bash Auth0 CLI theme={null}
auth0 api get "tenants/settings"
```
```bash cURL theme={null}
curl --request GET \
--url 'https://{yourDomain}/api/v2/tenants/settings' \
--header 'Authorization: Bearer {YOUR_MANAGEMENT_API_TOKEN}'
```
レスポンス内の `dynamic_client_registration_security_mode` プロパティを確認してください。存在しない場合、DCR クライアントは現在、既存の動作をデフォルトで使用しています。
動的に登録されたクライアントに適用するセキュリティモードを選択します。
**オプション A: DCR クライアントに強化されたセキュリティ制御を適用する** (推奨)
DCR で strict モードを有効にする前に、サードパーティアプリケーション向けの[デフォルト権限](/docs/ja-jp/get-started/applications/application-access-to-apis-client-grants#default-permissions-for-third-party-applications)を設定してください。デフォルト権限が設定されていない場合、DCR クライアントはいずれの API にもアクセスできません。
`dynamic_client_registration_security_mode` を `strict` に設定します。
```bash Auth0 CLI theme={null}
auth0 api patch "tenants/settings" \
--data '{
"dynamic_client_registration_security_mode": "strict"
}'
```
```bash cURL theme={null}
curl --request PATCH \
--url 'https://{yourDomain}/api/v2/tenants/settings' \
--header 'Authorization: Bearer {YOUR_MANAGEMENT_API_TOKEN}' \
--header 'Content-Type: application/json' \
--data '{
"dynamic_client_registration_security_mode": "strict"
}'
```
**オプション B: DCR クライアントの既存の動作を維持する**
`dynamic_client_registration_security_mode` を `permissive` のままにするか、`permissive` に設定します。
```bash Auth0 CLI theme={null}
auth0 api patch "tenants/settings" \
--data '{
"dynamic_client_registration_security_mode": "permissive"
}'
```
```bash cURL theme={null}
curl --request PATCH \
--url 'https://{yourDomain}/api/v2/tenants/settings' \
--header 'Authorization: Bearer {YOUR_MANAGEMENT_API_TOKEN}' \
--header 'Content-Type: application/json' \
--data '{
"dynamic_client_registration_security_mode": "permissive"
}'
```
詳しくは、[Dynamic Client Registration](/docs/ja-jp/get-started/applications/dynamic-client-registration)を参照してください。
機能比較
次の表では、各セキュリティモードで利用可能な機能を比較しています。
| 機能 | 強化されたセキュリティ制御 | 既存の動作 |
| ----------------------------- | -------------------------------------------------------------------------------------------------------------------------------- | ----------------------- |
| **グラントタイプ** | `authorization_code`, `refresh_token`, `client_credentials` | すべてのグラントタイプを利用可能 |
| **PKCE** | 必須 | 任意 |
| **OIDC** | 利用できません。今後のリリースでサポート予定です。 | サポート対象 |
| **API 認可** | 常に明示的なクライアントグラントが必要 | API のアクセスポリシーに従う |
| **Classic Login** | サポートされていません | サポート対象 |
| **レガシーエンドポイント** | 利用できません | 利用可能 |
| **Client ID の形式** | `tpc_` プレフィックス | 標準形式 |
| **設定可能なプロパティ** | [制限されたプロパティセット](/docs/ja-jp/get-started/applications/third-party-applications/security-controls#restricted-client-configuration) | すべてのプロパティ |
| **Organizations (ユーザーフロー) ** | サポート対象。organization には `third_party_client_access: allow` が必要 | サポートされていません |
| **今後の機能** | レート制限、および今後追加されるセキュリティ強化機能と管理機能 | 利用不可 |
| **Auth0 Dashboard 経由での作成** | 常に強化された制御を使用 | Auth0 Dashboard からは作成不可 |
よくあるケース
シナリオ 1: 最新の OAuth を使用するパートナー連携
**状況**: PKCE を使用する認可コードフローを利用し、API にアクセスするパートナー連携があります。
**推奨事項**: 強化されたセキュリティ制御 (オプション A) を採用してください。これは最新の OAuth 実装と完全に互換性があり、セキュリティ強化のメリットも得られます。
**手順**:
1. API のデフォルトのAPI権限を設定する
2. `third_party_security_mode: "strict"` を指定してパートナーアプリケーションを作成できるかテストする
3. 移行トグルをオフにして移行を完了する
シナリオ 2: OIDC が必要なアプリケーション
**状況**: サードパーティアプリケーションで、OIDC スコープ (openid、profile、email) または ID トークンが必要です。
**推奨事項**: サードパーティアプリケーション向けの OIDC サポートは、今後のリリースで提供される予定です。それまでは、既存の動作 (オプション B) を維持するか、API スコープ付きアクセストークンに移行してください。
**手順**:
* OIDC を使用する必要がある場合は、移行トグルを有効のままにし、アプリケーションの作成時に `third_party_security_mode: "permissive"` を明示的に指定します
* または、OIDC スコープではなく API スコープを使用するように連携を更新します
シナリオ 3: Dynamic Client Registration (MCP、AI エージェント)
**状況**: AI エージェント、MCP サーバー、または開発者ポータルのアプリケーションで DCR を使用しています。
**推奨事項**: `dynamic_client_registration_security_mode: "strict"` を設定し、デフォルトのAPI権限を設定します。MCP クライアント (Claude Code、VS Code) は強化されたセキュリティ制御に対応しています。
**手順**:
1. デフォルトのAPI権限を設定する
2. Management API で `dynamic_client_registration_security_mode: "strict"` を設定する
3. DCR 登録でテストする
4. DCR クライアントが access token を取得できることを確認する
シナリオ 4: Classic Login を使用するアプリケーション
**状況**: サードパーティアプリケーションで、Universal Login ではなく Classic Login を使用しています。
**推奨事項**: 強化されたセキュリティ制御が適用されるサードパーティアプリケーションでは、Classic Login はサポートされていません。Universal Login に移行するか、既存の動作を維持してください。
**手順**:
* 推奨: 強化された制御を導入する前に、Universal Login に移行する
* 代替: 移行トグルを有効のままにし、`third_party_security_mode: "permissive"` を明示的に指定する
シナリオ5: Organizations を使用するサードパーティアプリケーション
**状況**: サードパーティアプリケーション (パートナー連携、AI エージェント) で、組織コンテキスト内のユーザーを認証したい場合。
**推奨事項**: 強化されたセキュリティ制御を採用します。既存の動作では、サードパーティアプリケーションで Organizations を利用できません。サードパーティアクセスを許可する各組織で `third_party_client_access: allow` を設定します。
**手順**:
1. サードパーティアプリケーションで強化されたセキュリティ制御 (`third_party_security_mode: "strict"`) を使用していることを確認します。
2. 組織で `third_party_client_access: allow` を設定します。
```bash Auth0 CLI theme={null}
auth0 api patch "organizations/{ORG_ID}" \
--data '{
"third_party_client_access": "allow"
}'
```
```bash cURL theme={null}
curl --request PATCH \
--url 'https://{yourDomain}/api/v2/organizations/{ORG_ID}' \
--header 'Authorization: Bearer {YOUR_MANAGEMENT_API_TOKEN}' \
--header 'Content-Type: application/json' \
--data '{
"third_party_client_access": "allow"
}'
```
3. [組織に必要な接続を有効にします](/docs/ja-jp/manage-users/organizations/configure-organizations/enable-connections)。
4. 外部アプリケーションから `organization` パラメータが渡されることを前提にできないため、ユーザーが正しい組織コンテキストにルーティングされるよう、[Prompt for Organization または Organization Domain Discovery](/docs/ja-jp/manage-users/organizations/login-flows-for-organizations) を設定します。
詳細については、[組織のサードパーティアプリケーションアクセスを有効にする](/docs/ja-jp/manage-users/organizations/configure-organizations/enable-third-party-application-access)を参照してください。
トラブルシューティング
移行中によく発生するエラーの解決方法については、[サードパーティアプリケーションのトラブルシューティング](/docs/ja-jp/get-started/applications/third-party-applications/troubleshooting)を参照してください。
よくある質問
既存のアプリケーションのセキュリティモードは変更できますか?
いいえ。`third_party_security_mode` はアプリケーションの作成時に設定されるため、後から変更することはできません。別のセキュリティモードを使用するには、新しいアプリケーションを作成してください。
既存のサードパーティアプリケーションはどうなりますか?
何も変わりません。既存のサードパーティアプリケーションは、現在とまったく同じように引き続き動作します。この移行で影響を受けるのは、新しく作成されるアプリケーションのデフォルト設定だけです。
同じテナント内で両方のセキュリティモードを使用できますか?
はい。一部のサードパーティアプリケーションには強化されたセキュリティ制御を適用し、他のアプリケーションには従来どおりの動作を維持できます。セキュリティモードはアプリケーションごとに設定されます。
Dynamic Client Registration については?
DCR は、`dynamic_client_registration_security_mode` という別のテナント設定で制御されます。これは非推奨化とは別のものであり、個別に設定を判断する必要があります。詳しくは、[Dynamic Client Registration](/docs/ja-jp/get-started/applications/dynamic-client-registration) をご覧ください。
期限後も既存の動作でアプリケーションを作成できますか?
はい。ただし、Management API を使用する場合に限ります。各アプリケーションの作成時に、`third_party_security_mode: "permissive"` を明示的に設定してください。Auth0 Dashboard では、既存の動作でアプリケーションを作成することはできません。
今後の機能は既存の動作でも利用できますか?
今後提供される一部の機能 (アプリケーション単位のレート制限など) は、強化されたセキュリティ制御が適用されたアプリケーションでのみ利用できます。
詳しくはこちら
* [サードパーティアプリケーション](/docs/ja-jp/get-started/applications/third-party-applications)
* [サードパーティアプリケーションのセキュリティコントロール](/docs/ja-jp/get-started/applications/third-party-applications/security-controls)
* [ファーストパーティアプリケーションとサードパーティアプリケーション](/docs/ja-jp/get-started/applications/first-party-and-third-party-applications)
* [API へのアプリケーションアクセス: クライアントグラント](/docs/ja-jp/get-started/applications/application-access-to-apis-client-grants)
* [Dynamic Client Registration](/docs/ja-jp/get-started/applications/dynamic-client-registration)
* [サードパーティアプリケーションのトラブルシューティング](/docs/ja-jp/get-started/applications/third-party-applications/troubleshooting)
* [OAuth 2.1 仕様](https://datatracker.ietf.org/doc/html/draft-ietf-oauth-v2-1)